|
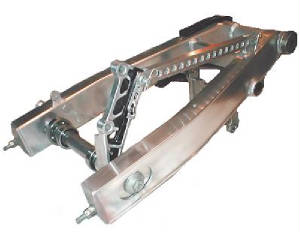
FZ600 SWINGARM MODIFICATION
Click the swingarm to view instructions and pics of this mod-Thanks rz350land!
 |
|
|
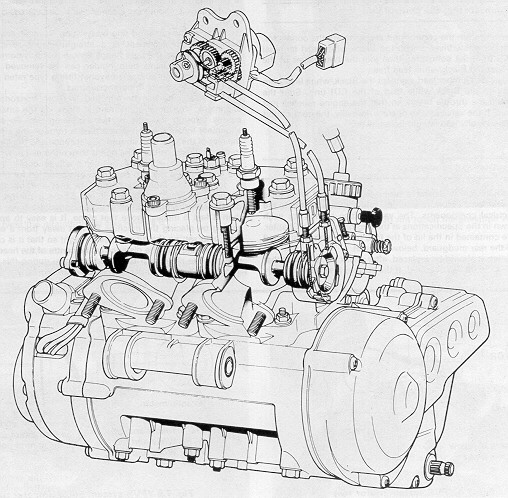
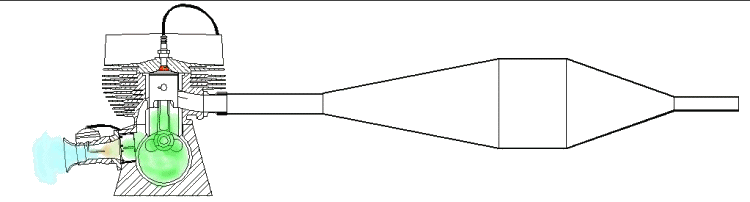
| Expansion Chamber Function--Click for Tuned Pipe Info |
|
|
|
|
|
|
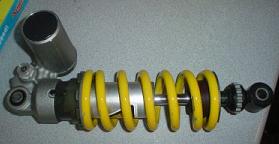
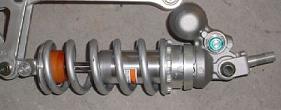
| 1999-2002 R6 SHOCK |
|
|
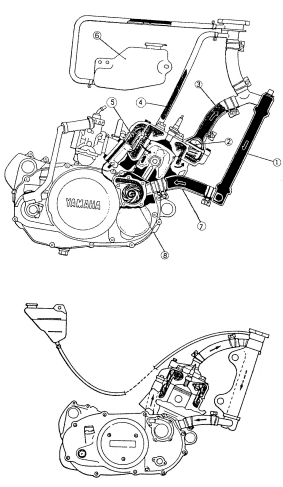
| 2004 R1 SHOCK MODIFICATION--Click Pic for Info |
|
|
|
|
|
Learn how to set-up your suspension by clicking the link below--fantastic
information!
CLICK HERE TO LEARN HOW TO SET UP YOUR SUSPENSION--FRONT AND REAR!!
R6 Shock Install Instructions:
Need the following--
- 99-02 R6 shock (It is important that this is the shock that you use b/c it has the
horizontally mounted resevoir. Other years have a vertically mounted resevoir that ends up hitting the swingarm and
does not work).
Bushings that must be pressed into the upper and lower shock mounts--these bushings
can be found at McMaster Carr (See link below). Sizes are as follows:
- For the upper bushings: 2x part number 6659 K36 Metric SAE 841 Bronze
Flanged Bearing for 18mm shaft diameter, 22mm OD, 18mm length.
- For the lower bushings: 2x part number
6659 K41 Metric SAE 841 Bronze Flanged Bearing for 20mm shaft diameter, 24mm OD, 16mm length.
- From the R6 shock you need to remove the bushing from the top mount,
and the bearing from the bottom mount. You can bring this to a shop to press out for you, and have them press the new
ones in at the same time--otherwise you can work with it on your own.
- Check your manual as to how to take the rear end apart in order to get the shock
off so that you can put the R6 shock in--if you dont have a manual and need the information you can check the link at the
bottom of these install directions,it has some info on it.
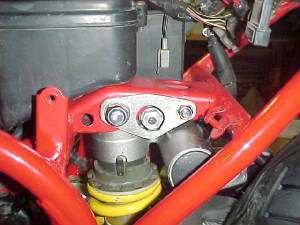
- You should have your bushings pressed
in by this stage. The new shock has the resevoir that interferes with the frame. You can use a dremel or anything
else that you can get to work to make room for it on the upper shock mount. Dont be hasty! Dremel
a bit, and then do a fit check. This is an integral point on your frame and you should leave as much of the mount as
you can. Later you should make up a bracket that bolts onto the mount, or weld one onto it in order to give the mount
some integrity after you hack it a bit. See pic below.
- Once the shock fits, put the top bolt through and make sure the shock can
swing far enough back so the lower linkages fit. There will be some side to side movement of teh shock in the upper
mount, make sure that when the shock is over to the left that the shock can still swing to reach the lower mounts.
Make sure you tighten the upper bolt adequately.
- Line up all of your suspension linkages as they were previously and put
the bolt through the bottom shock mount and tighten.
- The fender and the chain guard will likely need to be trimmed in order
to make room for the resevoir. Cut as much as necessary, again, keep fit testing!!
This is not my work--I read this on the link below, and it was also posted on one
of the forums--but has since been lost. Check out the link below for some more commentary on the modification.
|
Quantity |
Part Number |
Description |
Unit Price |
Total Price |
|
|
Metric SAE 841 Bronze Flanged-Sleeve Bearing for 18 mm Shaft Diameter,
22 mm OD, 18 mm Length
Please enter a quantity. |
$2.82 Each |
$5.64 |
|
|
Metric SAE 841 Bronze Flanged-Sleeve Bearing for 20 mm Shaft Diameter,
24 mm OD, 16 mm Length
Please enter a quantity. |
$2.79 Each |
$5.58 |
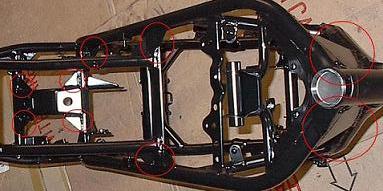
| UPPER SHOCK MOUNT SUPPORT BRACKET ON EACH SIDE |
|
F4i Shock Conversion
Need the following--
- Honda F4i shock--Available very cheap on E-bay--just search "F4i shock"
Bushings that must be pressed into the lower shock mount--these bushings
can be found at McMaster Carr (See link below). Sizes are as follows:
- For the lower bushings: 2x part number 6658 K44--20mm shaft diameter,
24mm OD, 20mm length. Prices and order looks like this:
|
Line |
Quantity |
Part Number |
Description |
Unit Price |
Total Price |
|
Ships |
|
1 |
2
Each |
6658K44 |
Metric SAE 841 Plain Bronze
Sleeve Bearing For 20 mm Shaft Dia, 24 mm OD, 20 mm Lg |
$3.43
|
$6.86
|
|
today |
|
Merchandise |
$6.86 |
|
|
- From the shock you need to remove the bearing from the
bottom mount. You can bring this to a shop to press out for you, and have them press the new bronze sleeves in at
the same time--otherwise you can work with it on your own.
- Fit check the pin from the RZ linkages to see if you need to lightly
sand/file the brass bushings. When installed, the sleeves compress a bit and may need to be sanded a little bit.
This has been my experience on every one that I have done.
- Drill out the top shock mount using a 12mm drill bit to accept the upper
shock bolt from the RZ. The existing sleeve in the top mount is large enough to be drilled out and reused. The
sleeve can remain in the shock to do this.
- Check your manual as to how to take the rear end apart in order to get
the shock off so that you can put the F4i shock in--if you dont have a manual...you should get one!
- Reuse the RZ bolts to mount the new shock into place and re-install
the rear end!
- Now find a place to mount the remote resevoir--some companies make mounting
brackets, or you can use hose clamps to mount it to the frame somewhere accessible for adjusting.
I would space out the top shock mount--the F4i top mount is narrower than
the stock shock. Stock measures about 40mm, F4i measures about 28mm. It is not likely that there will be issues
if this is not done, but I am not willing to play the odds. This can be done with washers, or cut the sleeve
from the upper mount of the stock shock. It already has the correct dimensions.
ACCOMPANYING PICS TO FOLLOW SOON
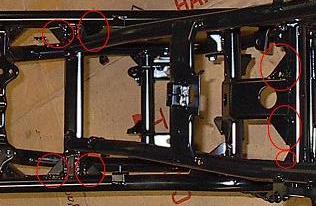
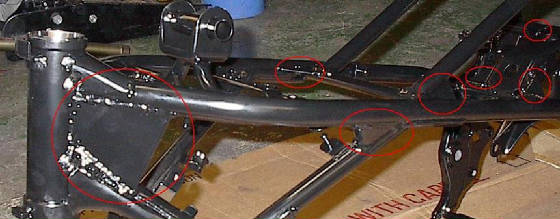
Frame Bracing:
No more apologies--we now know whose pics these
are!! Stan (aka RZBeebe; Beebe) whose ride you can see on the visitor's page--or at least what it looked like when he
got it. I will be posting links to larger, more detailed pics shortly. Bracing done with .060
steel plating.
|